
Halloween decorating does not have to mean spending a lot of money on seasonal decorations that only come out for a few weeks each year. An easy DIY lighted ghost wreath is one of those projects that can completely change the look of an entryway while still feeling simple, cozy, and homemade.
I wanted something with that soft Pottery Barn Halloween look, but I also wanted to make it with materials that were easy to find and simple enough to work with at home.
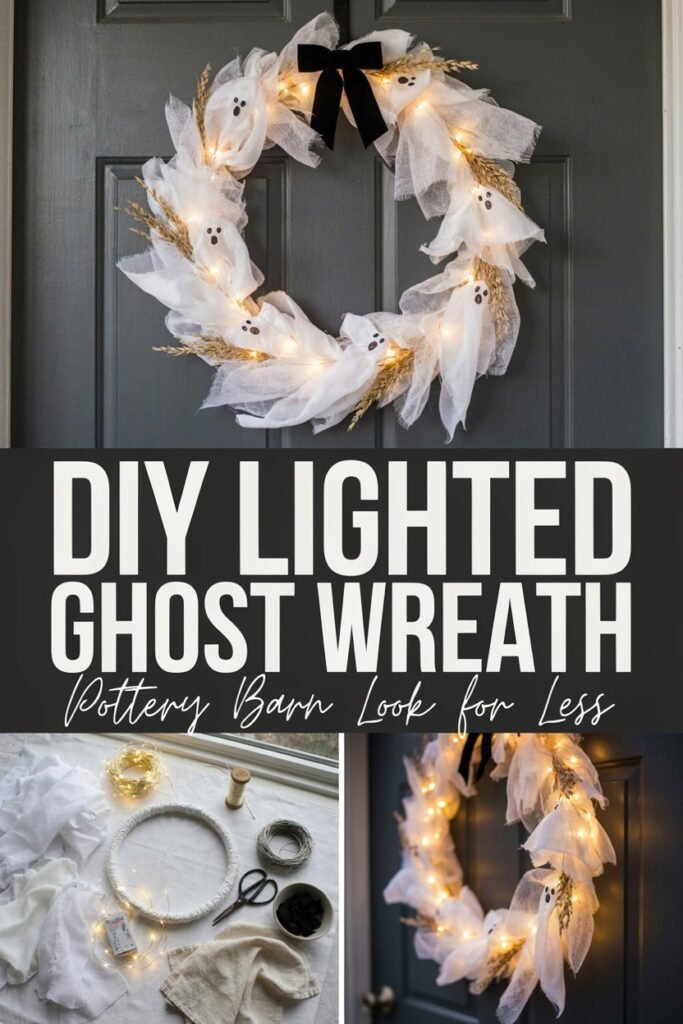
The result was a lighted ghost wreath with white fabric ghosts, warm glowing lights, and a slightly rustic finish that looks especially pretty once the sun goes down. What I like about this Halloween wreath is that it does not require complicated crafting skills.
You can adjust the size, number of ghosts, type of lights, and amount of decoration to suit your own front door or indoor space. In this guide, I will show you how I planned the wreath, what materials worked best for me, and the little details that helped give this inexpensive DIY Halloween decoration a much more polished appearance.
Why I Love This DIY Halloween Wreath
I have always liked Halloween decorations that feel a little more understated rather than filling every available space with bright orange and plastic decorations. For this wreath, I wanted the ghosts to be the main attraction, with the lights providing just enough glow to make everything feel warm in the evening.
The biggest advantage of making the wreath yourself is that you can control the finished look.
You can make it:
• Minimal and elegant
• Spooky and dramatic
• Soft and farmhouse inspired
• Whimsical for children
• Neutral enough to work with your existing fall decorations
The white ghosts also make this wreath surprisingly versatile. Instead of looking like a decoration that can only be used on Halloween night, it has a softer seasonal appearance that works throughout October.
When I was putting mine together, I found that keeping the color palette simple made the wreath look much more expensive. White fabric, natural branches or greenery, warm white lights, and a small amount of black detailing were enough to create the look I wanted.
What You Need
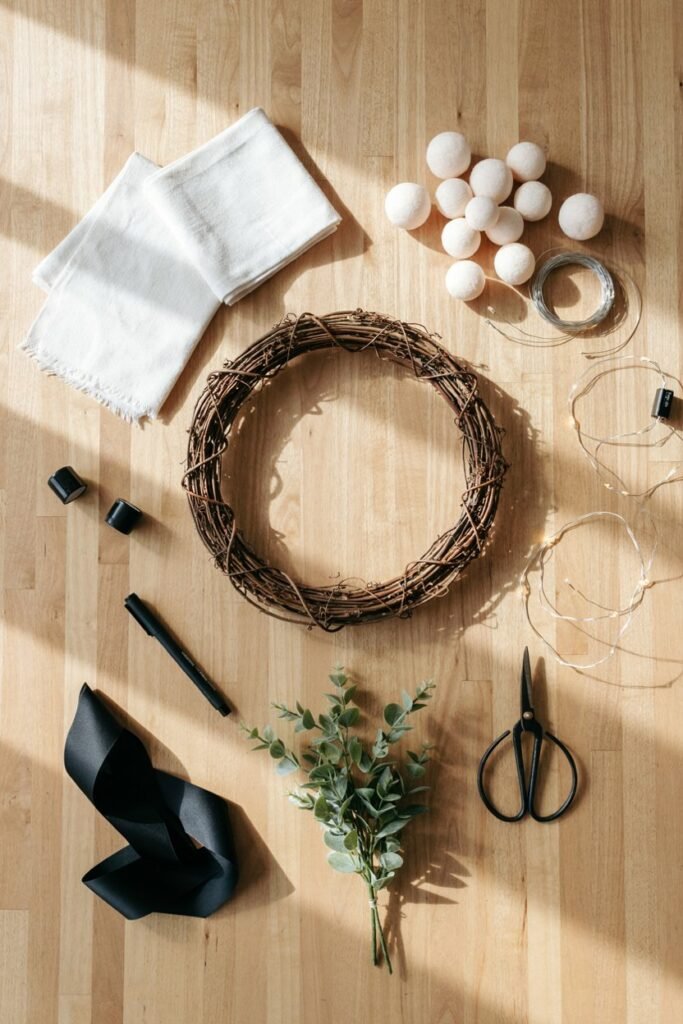
You do not need a huge craft supply collection for this project. Most of the materials are inexpensive and several can be reused for other seasonal crafts.
Wreath Base
Start with a grapevine wreath, faux greenery wreath, twig wreath, or another sturdy circular base.
I prefer a natural looking wreath base because the brown branches showing through the white ghosts give the finished project some texture. If you already have an old wreath sitting in storage, this is also a great way to give it a completely different purpose.
For a standard front door, a wreath around 18 to 22 inches usually gives you enough room to create several ghosts without making the arrangement look crowded.
White Fabric
You will need lightweight white fabric for the ghosts.
Muslin, cheesecloth, gauze, or another loosely woven white material can work well. I like fabric with a little texture because completely smooth white material can make the ghosts look more like small covered balls than floating figures.
You can also use inexpensive white fabric you already have at home.
The important thing is that the material should be light enough to drape naturally.
Small Foam Balls or Similar Forms
These create the heads of the ghosts.
You do not need anything fancy. Small foam balls are easy to cover and give each ghost enough structure to hold its shape.
The size you choose will determine how noticeable each ghost looks. Smaller heads create a delicate wreath, while larger heads make the ghosts more dramatic.
Floral Wire or Craft Wire
A small amount of wire helps secure the ghosts to the wreath.
I prefer wire for this project because it gives me more control than glue. It also makes it easier to adjust the ghosts after everything has been assembled.
If you are making the wreath for outdoor use, secure each piece carefully because wind can quickly turn a loosely attached decoration into a repair project.
Battery Operated String Lights
This is the part that makes the wreath feel special once the room gets dark.
Warm white lights create a softer Pottery Barn inspired appearance, while cool white lights give the wreath a more traditional spooky Halloween feeling.
I personally prefer warm white lights because they work beautifully with the neutral fabric and natural wreath base.
Battery operated lights are especially convenient if your front door does not have an outdoor electrical outlet nearby.
Before attaching them, test the lights and make sure the battery pack is easy to reach.
There is nothing more frustrating than finishing a wreath and realizing the battery compartment is trapped behind several layers of decoration.
Black Marker or Fabric Paint
You only need a tiny amount of black for the ghost faces.
Keep the faces simple.
Two dark eyes and a small mouth are usually enough.
I found that making every face slightly different gave the ghosts more personality. Perfectly identical faces can make handmade decorations look overly manufactured.
Optional Greenery and Ribbon
These are completely optional.
If you want a fuller wreath, you can add small pieces of faux eucalyptus, dried branches, Spanish moss, black ribbon, or neutral ribbon.
I would avoid adding too many elements, though.
The ghosts and lights should remain the focus.
Choosing the Right Wreath Base
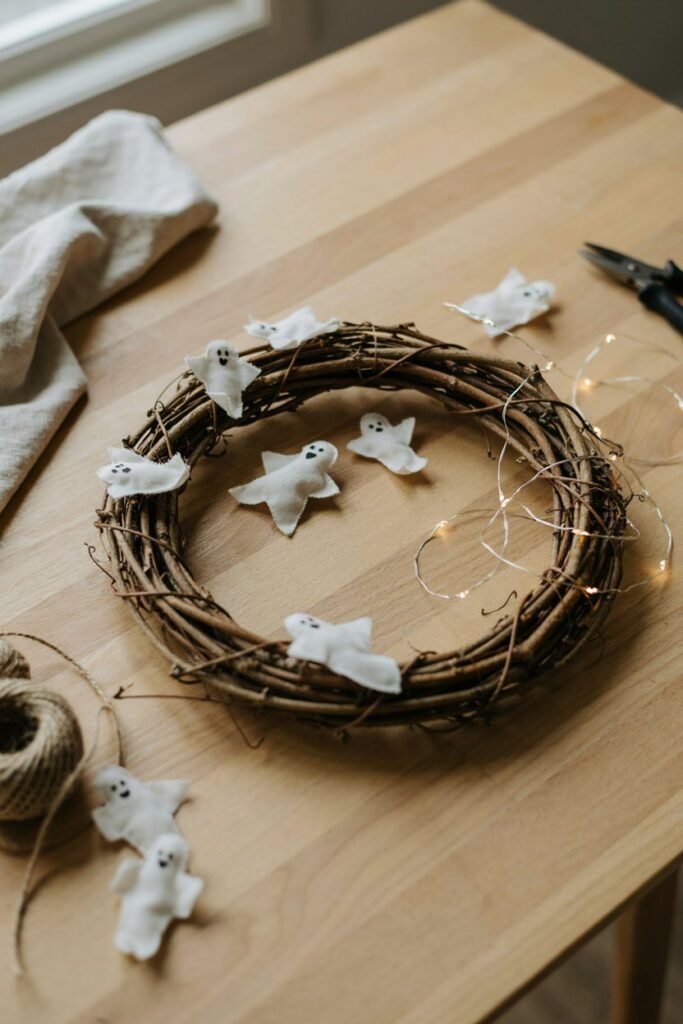
The wreath base determines how easy the rest of the project will be.
A grapevine wreath is one of my favorite choices because the branches naturally provide little places where you can tuck fabric, wire, greenery, and lights.
A foam wreath can also work, particularly if you want a very clean and polished finished design.
If you are planning to hang the wreath outside, I recommend choosing a base that is sturdy enough to handle movement from wind and occasional moisture.
Think about where the wreath will actually live before you start crafting.
For an indoor wall, you have much more freedom.
For a covered porch, you need to think about humidity and wind.
For an exposed front door, every attachment needs to be more secure.
That small bit of planning can make a big difference in how long your finished wreath lasts.
How I Planned the Ghost Arrangement
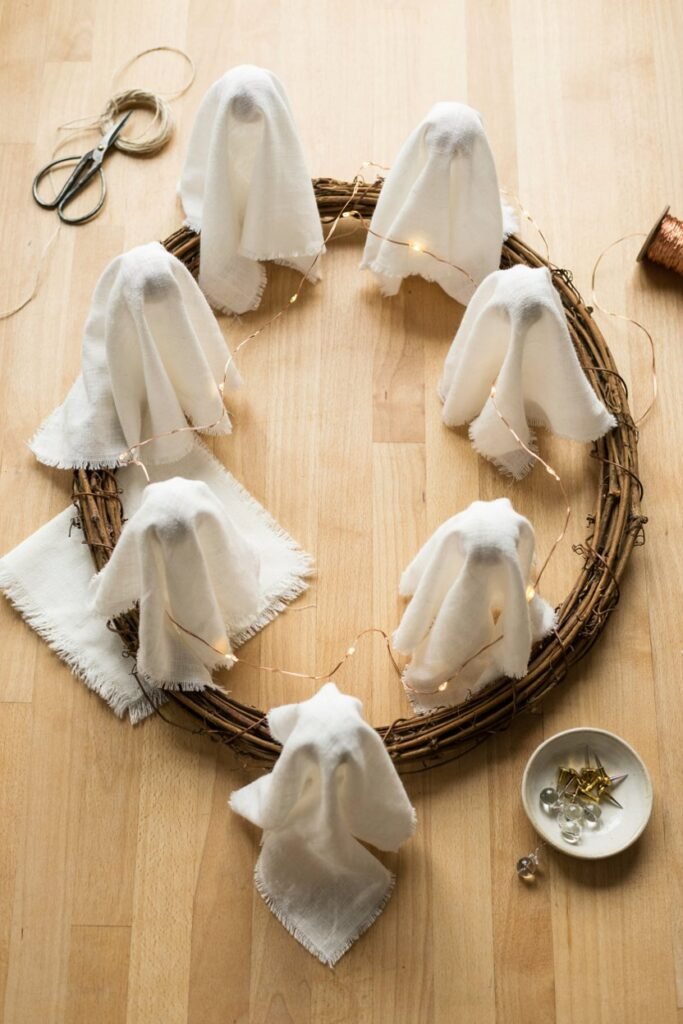
One of the things I learned while making this wreath was that it is much easier to plan the arrangement before permanently attaching anything.
I placed the wreath flat on a table and arranged the unfinished ghost shapes around the circle.
I did not space them perfectly.
Instead, I varied their positions slightly so some appeared higher while others sat closer to the center of the wreath.
This created a more natural floating effect.
If every ghost is positioned at exactly the same height, the wreath can look too organized. A little variation makes the arrangement feel more playful and gives the eye somewhere different to look.
I also left some of the wreath base visible.
That was important for the look I wanted because the contrast between the darker natural branches and the white ghosts helps the fabric stand out.
Creating a More Expensive Looking Halloween Wreath
You do not necessarily need expensive materials to make a DIY wreath look expensive.
The trick is usually in the restraint.
I found that three things made the biggest difference with this project.
First, I kept the color palette simple.
Second, I avoided covering every inch of the wreath.
Third, I paid attention to how the lights were positioned.
The lights should not simply be wrapped randomly around the wreath. They should be distributed so the glow appears between and behind the ghosts.
When the wreath is hanging on the door, those little points of light create depth.
During the day, the wreath looks clean and decorative.
At night, the lights completely change it.
That day to night difference is one of my favorite things about this project.
Before You Start
Give yourself enough table space to lay out the entire wreath.
I also recommend testing your lights, preparing all of the ghost heads, and cutting the fabric pieces before you begin attaching everything.
Doing these small tasks first makes the actual assembly much easier.
It also lets you step back and decide whether you like the proportions before anything is permanently secured.
For me, the most important part of a handmade decoration is not making every detail perfect. It is making sure the finished piece looks intentional.
That is what I kept in mind while putting this wreath together.
Step 1: Prepare the Ghost Heads
Start by preparing the small foam balls that will become the ghost heads.
If your foam balls have an uneven surface, you can gently smooth any noticeable imperfections before covering them. They do not need to be perfect because the fabric will hide most small flaws.
Cut your white fabric into pieces large enough to completely cover each foam ball with enough material left underneath to create the flowing body of the ghost.
I recommend cutting a few pieces first rather than preparing the entire amount of fabric at once.
The reason is simple.
Once you place the first piece of fabric over the head, you will have a much better idea of how much material you actually need.
Too little fabric makes the ghost look short and stiff.
Too much fabric can make the wreath look bulky.
I found that lightweight fabric with uneven edges actually looked better than perfectly straight cuts because the irregular edges helped create the loose, floating appearance I wanted.
Step 2: Shape the Fabric Around Each Ghost
Place one piece of white fabric over a foam ball and gently pull the material downward.
Do not stretch the fabric tightly around the head.
You want it to fall naturally.
Gather the fabric underneath the foam ball and secure it with a small piece of floral wire, thin craft wire, or another suitable fastener.
The head should remain rounded while the fabric below it hangs loosely.
This is where you can give each ghost a slightly different shape.
Some can have longer fabric.
Some can have shorter fabric.
Some can have one side hanging lower than the other.
I prefer this imperfect arrangement because it makes the ghosts look as though they are floating instead of looking like identical ornaments.
Step 3: Add the Ghost Faces
Once the fabric is secured, add the faces.
A black permanent marker is probably the simplest option, although black fabric paint can also work if you want a more defined finish.
Keep the facial features small.
I made the eyes simple and slightly different from one ghost to another. A tiny mouth can make one ghost look surprised while another can have a more traditional spooky expression.
Do not worry about making them perfectly symmetrical.
In fact, I think slightly imperfect faces make a handmade Halloween wreath more charming.
If you are making this wreath with children, this is also one of the easiest parts of the project to let them help with.
Just make sure the adults handle any wire, sharp tools, or other materials that require more care.
Step 4: Test Your String Lights
Before attaching the lights to the wreath, turn them on and test the entire strand.
Check the batteries.
Make sure every bulb is working.
Then look at where the battery compartment will sit once the wreath is hanging.
This is a small step, but it saves a lot of frustration later.
I recommend choosing battery operated string lights with a compact battery pack so it can be hidden behind the wreath without making the front look bulky.
Warm white lights are my favorite for this design because they create a soft glow behind the white fabric.
If you prefer a more dramatic Halloween appearance, you could use brighter white lights instead.
Step 5: Attach the Lights to the Wreath
Lay the wreath flat and begin wrapping the lights around the base.
Do not wrap them so tightly that the wire becomes difficult to adjust.
Instead, loosely position the strand around the wreath, keeping enough flexibility to move individual sections later.
I like to place some lights toward the inside of the wreath and some toward the outside.
This creates more depth than keeping every bulb around the exact same part of the wreath.
Try to position a few lights behind the areas where the ghosts will sit.
When the lights shine through the spaces between the fabric pieces, the ghosts appear to have a subtle glow around them.
That is the effect that really makes this wreath stand out at night.
Step 6: Position the Ghosts
Now place your finished ghosts around the wreath.
Do not attach them immediately.
Move them around until you like the arrangement.
I usually start with the largest or most noticeable ghost and then build the arrangement around it.
Try placing a few ghosts toward the outer edge of the wreath and others slightly closer to the center.
This gives the design more dimension.
You can also turn some of the ghosts slightly instead of having every face point directly forward.
That small change can make the wreath feel much more natural.
Step back several feet and look at it from a distance.
This is important because something that looks perfectly balanced when you are standing directly over the table can look completely different once it is hanging on a door.
Step 7: Secure Each Ghost
Once you are happy with the arrangement, secure each ghost to the wreath.
Floral wire works particularly well because you can thread it through the fabric and around the wreath base without making the attachment obvious.
Twist the wire securely at the back.
Keep the ends tucked away so nothing sharp is exposed.
If you are using the wreath indoors, you can also use small craft attachments or another suitable method depending on the materials you have chosen.
For an outdoor wreath, I would always prioritize a secure attachment.
Wind can easily catch the loose fabric and pull a poorly attached ghost away from the wreath.
Step 8: Create Natural Fabric Movement
This is one of my favorite parts of the entire project.
Once all the ghosts are attached, gently separate the fabric around their bodies.
Pull a few sections slightly outward.
Let other sections hang closer to the wreath.
You want the fabric to have movement.
If everything hangs straight down, the ghosts can look more like covered balls attached to a wreath.
By gently shaping the material, you can make them appear to float.
I also like allowing a few pieces of fabric to overlap the wreath branches.
It helps blend the ghosts into the base instead of making them look like separate decorations simply placed on top.
Step 9: Hide the Light Wire
Take a few minutes to look closely at the wreath from the front.
If you can clearly see long sections of the light wire, gently reposition them.
Use the wreath branches, fabric, and greenery to hide areas that look too obvious.
You do not need to hide every inch of wire.
Some of it will naturally disappear once the wreath is hanging.
The goal is simply to prevent one section of exposed wire from becoming visually distracting.
This is another detail that can make a simple DIY project look much more polished.
Step 10: Add Optional Greenery
If your wreath looks a little too plain, add a small amount of greenery.
Faux eucalyptus, thin branches, dried looking foliage, or muted fall stems can work nicely.
I would keep this part restrained.
The ghosts are already the main feature, and adding too much greenery can make the wreath look like a traditional fall wreath with ghosts attached to it.
For the Pottery Barn inspired appearance I was going for, I preferred allowing the natural wreath base to remain visible.
The combination of brown branches, white fabric, and warm lights already gave me enough texture.
Step 11: Check the Wreath From Different Angles
Before calling the project finished, hang the wreath temporarily or hold it upright.
Look at it straight on.
Then look at it from the side.
Check the bottom.
Check the center opening.
You may notice that one ghost is hidden or that a section of lights is too concentrated in one area.
This is the time to make those adjustments.
I always find that wreaths look different once they are vertical because gravity changes the way the fabric hangs.
A ghost that looked perfectly positioned while the wreath was flat may suddenly lean too far to one side once it is hanging.
A few small adjustments can make the entire arrangement feel more balanced.
Step 12: Do a Nighttime Test
Turn off the nearby lights and switch on the wreath lights.
This is when you get to see whether the placement actually worked.
Look for areas that are completely dark.
If one side of the wreath has several glowing bulbs while another side has almost none, gently reposition the light strand.
The ghosts should not all be brightly illuminated.
A little darkness between them is what gives the wreath its depth.
I actually prefer when some parts of the wreath remain slightly shadowed because it makes the glowing sections more noticeable.
What I Would Change If I Made It Again
One thing I learned while putting this wreath together was that it is easy to overdecorate it.
My instinct was to keep adding little details because I wanted the wreath to feel finished.
But once the ghosts, lights, and wreath base were arranged properly, I realized that adding more would actually take away from the look.
The simpler arrangement felt more intentional.
I would also spend more time testing the lights before securing the ghosts. Once everything is attached, moving the light strand becomes more difficult.
And I would definitely avoid making all of the ghosts exactly the same size.
A little variation gives the wreath much more personality.
Making the Wreath Work for an Outdoor Door
If you plan to hang this Halloween wreath outside, think about the weather before choosing your materials.
A covered porch is easier because the wreath has some protection from rain and strong wind.
If the door is completely exposed, lightweight fabric can become damp and messy, and unsecured decorations may move around.
For outdoor use, secure the ghosts more firmly and choose materials that can tolerate the conditions where you live.
I would also avoid leaving the wreath outside during severe weather.
Even a well secured handmade wreath will last much longer when it is protected from heavy rain and strong wind.
The Little Details That Make It Look Store Bought
The finished wreath does not need expensive decorations to have a polished appearance.
For me, the biggest difference came from keeping the colors simple, varying the ghost positions, hiding unnecessary wire, and using the lights strategically.
The fabric also makes a difference.
A lightweight textured material has much more character than thick white fabric that holds a stiff shape.
Most importantly, do not try to make every part perfectly symmetrical.
The slightly uneven arrangement is what gives this wreath its handmade charm while still creating the elegant Halloween look I wanted.
How to Style and Customize Your Lighted Ghost Wreath
Once the wreath was completely assembled, I found that the fun part was deciding where to hang it and how much of the Halloween look I wanted around it. The wreath itself has enough personality to stand alone, so you do not need to decorate the entire doorway to make it noticeable.
I actually prefer giving the wreath a little space around it.
That lets the white ghosts and warm lights become the focal point instead of competing with several other decorations.
Style It on the Front Door
A lighted ghost wreath works especially well on a front door because it changes throughout the day.
During daylight, the white fabric and natural wreath base create a simple seasonal decoration.
Once evening arrives, the string lights become much more noticeable and give the ghosts a soft glow.
If your front door is dark, the white fabric will stand out beautifully.
If you have a white or light colored door, adding a darker wreath base or a little black ribbon can create more contrast.
I would hang the wreath around eye level so the ghost faces are easy to see.
You also want to make sure the battery pack is accessible from the side or underneath the wreath. That makes turning the lights on and off much easier.
Create a Simple Halloween Entryway
You do not need a full Halloween display around the door.
A few carefully chosen decorations can make the wreath feel like part of a larger arrangement.
You could place a couple of pumpkins near the bottom of the door, add a simple lantern beside the entrance, or use a small black planter with seasonal branches.
I like keeping the colors coordinated.
White pumpkins, natural wood, muted greenery, and small touches of black work particularly well with the ghost wreath.
The goal is to create a consistent look rather than filling every empty space.
Make It More Spooky
If you prefer traditional spooky Halloween decorations, there are several easy ways to change the appearance.
Use cooler white lights instead of warm white.
Add a little black fabric to some of the ghosts.
Make the ghost faces slightly larger.
Add dark faux branches around the wreath.
You could also place a few small plastic spiders between the ghosts.
I would still keep these additions limited.
Too many Halloween elements can hide the simple shape of the wreath.
Give It a Softer Farmhouse Look
For a more neutral fall appearance, skip the dramatic Halloween decorations.
Use warm white lights, natural grapevine, soft white fabric, muted greenery, and a simple neutral ribbon.
You could also add a few dried looking stems around the outer edge.
This version works particularly well if you already decorate your home with neutral colors during fall.
The ghosts become more whimsical than frightening.
That is one reason I like this particular DIY.
You can change the mood without having to make an entirely different wreath.
Make the Ghosts Different Sizes
Another easy way to customize the wreath is to use different sized foam balls.
Larger ghosts can become the focal point while smaller ones fill the spaces around them.
If you are making a large wreath, this can help prevent the arrangement from looking flat.
I would place the larger ghosts slightly off center rather than putting the biggest one directly at the top.
That usually creates a more natural visual balance.
Try Different Ghost Faces
The faces are another easy place to personalize the project.
You can make them:
• Cute
• Sleepy
• Surprised
• Slightly spooky
• Completely expressionless
For a family friendly Halloween wreath, simple round eyes and tiny mouths are enough.
For a more dramatic look, make the eyes slightly larger and use irregular shapes.
I would practice the faces on scrap fabric before drawing directly onto your finished ghosts.
It is much easier to experiment before the wreath is assembled.
Add a Black Ribbon
A black ribbon can add contrast without overwhelming the white ghosts.
You could tie a simple bow at the bottom of the wreath or attach a narrow ribbon near the top.
For a more sophisticated appearance, use a matte black ribbon instead of a shiny one.
If you are going for the Pottery Barn inspired look, I would keep the ribbon simple and avoid oversized bows.
The wreath already has plenty of texture from the fabric.
How to Keep the Wreath Looking Good
Because the ghosts are made from lightweight fabric, they can collect dust over time.
If you are displaying the wreath indoors, gently dust it with a soft brush or use a low setting on a handheld vacuum if appropriate for your fabric.
For outdoor use, check the wreath periodically.
Make sure the fabric is still secure and that the light strand has not shifted.
If the wreath becomes wet, allow it to dry completely before storing it.
I would also avoid spraying cleaning products directly onto the fabric because they can cause discoloration.
What to Do With the Wreath After Halloween
One of the reasons I like making seasonal decorations myself is that they can be stored and reused.
When Halloween is over, remove the batteries from the light pack before putting the wreath away.
Check all of the wire attachments and repair anything that has loosened.
Then place the wreath inside a large storage container or breathable protective bag.
Do not compress the ghosts too tightly.
The fabric can become permanently creased, and the foam heads may get misshapen if heavy decorations are placed on top.
If you have enough storage space, keeping the wreath upright is even better.
That helps preserve the shape of the fabric.
Common Problems and Easy Fixes
The Ghosts Look Flat
If your ghosts are looking more like pieces of fabric than floating figures, check the shape of the head.
The foam ball needs to provide enough structure underneath the fabric.
You can also loosen the fabric around the body and create more uneven folds.
The Wreath Looks Too Crowded
Remove one or two ghosts and look at the arrangement again.
It is surprisingly easy to add too many decorations.
Leaving small spaces between the ghosts gives the lights somewhere to shine through and makes the wreath look more dimensional.
The Lights Are Too Bright
If the lights overpower the ghosts, reposition some of the bulbs behind the fabric.
You want the lights to create a glow rather than make the entire wreath look like a bright light fixture.
Warm white lights can also create a softer appearance.
The Ghosts Keep Moving
If you are using the wreath outside, strengthen the wire attachments.
Make sure the wire is wrapped around the wreath base rather than simply pushed through the fabric.
For particularly windy areas, secure the fabric at more than one point.
The Battery Pack Is Visible
Move it behind the wreath and use the wreath base or hanging hardware to help conceal it.
Before permanently securing it, make sure you can still reach the switch.
This is something I always check before considering a seasonal decoration finished.
Can I Use This Wreath Indoors?
Absolutely.
An indoor wall, hallway, fireplace area, staircase, or covered entryway can all work.
For indoor decorating, you have more freedom with the fabric and decorative materials because you do not have to worry as much about wind and moisture.
A hallway wall can actually be a fun place for this wreath because the lights become more noticeable in the evening.
Can I Make the Wreath Larger?
Yes.
A larger wreath simply gives you more room to work with.
You can increase the number of ghosts, use larger fabric pieces, and add more lights.
Just remember that a larger wreath can become heavier, particularly if you add greenery and other decorations.
Make sure your hanging hardware can support the finished weight.
Can I Use Real Branches?
You can use natural branches if they are clean, dry, and sturdy.
Grapevine and twig wreaths are particularly useful because their irregular structure makes it easy to attach decorations.
If you collect branches yourself, inspect them carefully and allow them to dry completely before bringing them indoors.
Can I Use This Idea for Other Holidays?
The basic technique can easily be adapted.
Instead of ghost faces, you could create simple seasonal shapes for other occasions.
The wreath base can also be reused for fall, winter, or spring decorating by removing the ghosts and changing the accessories.
That is another reason I prefer working with a simple base.
You are not locked into one design.
My Final Thoughts on This DIY Ghost Wreath
What I like most about this project is that it gives you the look of a decorative Halloween wreath without requiring a long list of complicated supplies.
The finished piece has texture during the day and a completely different personality once the lights come on at night.
I also like that you can make it your own.
You can use a smaller wreath for an apartment door, make larger ghosts for a more dramatic entrance, use warm white lights for a softer appearance, or add darker details if you want something more traditionally spooky.
For my own decorating style, I found that keeping the design simple worked best. The white ghosts, natural wreath base, and glowing lights already created enough interest, so I did not need to cover every inch with Halloween decorations.
If you are looking for an easy DIY Halloween wreath that feels handmade but still has that polished seasonal decorating look, this lighted ghost wreath is a project I would happily make again.
The best part is seeing it hanging on the door in the evening when the little lights begin glowing between the ghosts. That is when all those simple materials finally come together and the wreath starts to feel like a real part of the Halloween season.