
There is something incredibly satisfying about making your own home decor with your hands.
Air dry clay projects have become one of my favorite ways to slow down, get creative, and make beautiful pieces without needing expensive tools or a pottery kiln.
One of the easiest and most rewarding projects you can start with is handmade clay bowls.
Air dry clay bowls are simple enough for beginners but stylish enough to look like expensive handmade pottery from a boutique store.
The best part is that you can finish most of these projects in a single day, making them perfect for weekend crafting, self care days, girls’ craft nights, or even thoughtful handmade gifts.
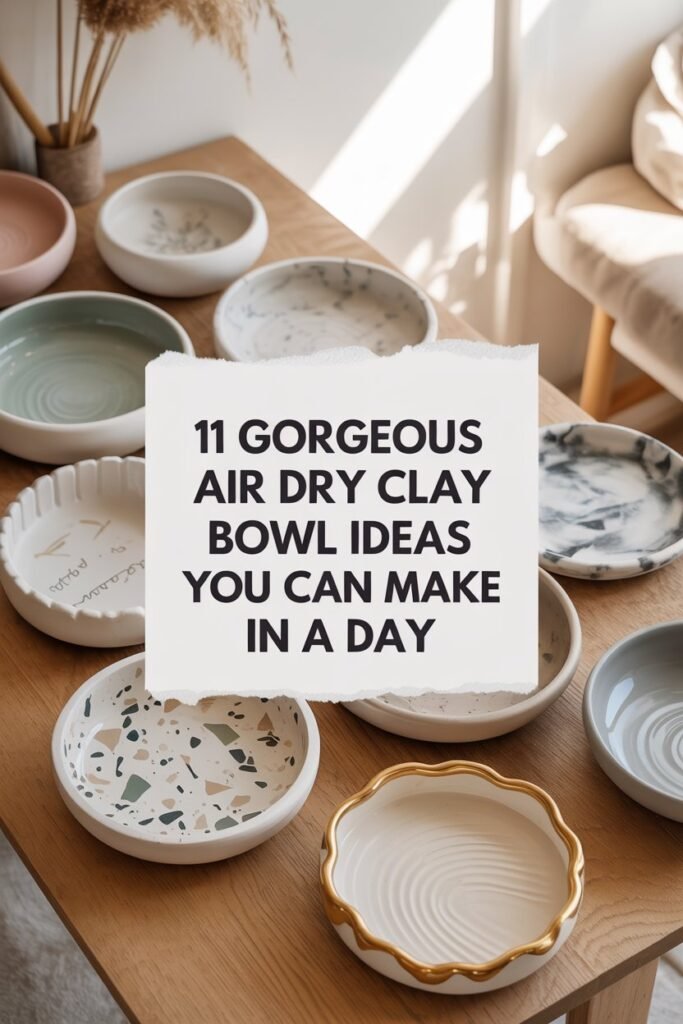
Whether you love minimalist decor, earthy textures, modern aesthetics, or colorful artistic pieces, there is a clay bowl idea here that will match your style perfectly.
These bowls can be used for jewelry storage, keys, candles, snacks, desk organization, bathroom decor, or simply as decorative pieces around your home.
In this guide, you will discover 11 gorgeous air dry clay bowl ideas you can make in a day, along with practical tips, beginner-friendly techniques, styling inspiration, and mistakes to avoid so your bowls turn out beautiful even if this is your first time working with clay.
Disclaimer: This post may contain affiliate links, which means I may earn a small commission at no extra cost to you. Always follow product instructions and allow clay projects to dry completely before painting or sealing for the best results.
Amazon Shopping List: Air Dry Clay Bowl Ideas
- Air Dry Clay Pack (White or Natural Clay)
- Clay Sculpting Tools Kit
- Silicone Craft Mat for Workspace Protection
- Acrylic Paint Set for Decorative Designs
- Paint Brushes Variety Set
- Clear Gloss Sealer or Varnish Spray
- Fine Grit Sandpaper Set for Smooth Finishing
Why Air Dry Clay Bowls Are So Popular
Air dry clay has become incredibly popular because it removes the intimidation that usually comes with pottery making.
Traditional ceramics often require a kiln, special tools, glazing, and technical knowledge.
Air dry clay gives you the creative freedom without the complicated setup.
People love making air dry clay bowls because they are:
Easy for beginners
Affordable to start
Mess free compared to traditional pottery
Customizable with endless designs
Relaxing and therapeutic
Perfect for home decor
Ideal for gifts and handmade businesses
Another reason these bowls are trending is because handmade home decor feels more personal and meaningful than mass produced items.
Every little fingerprint, texture, and shape adds character to the final piece.
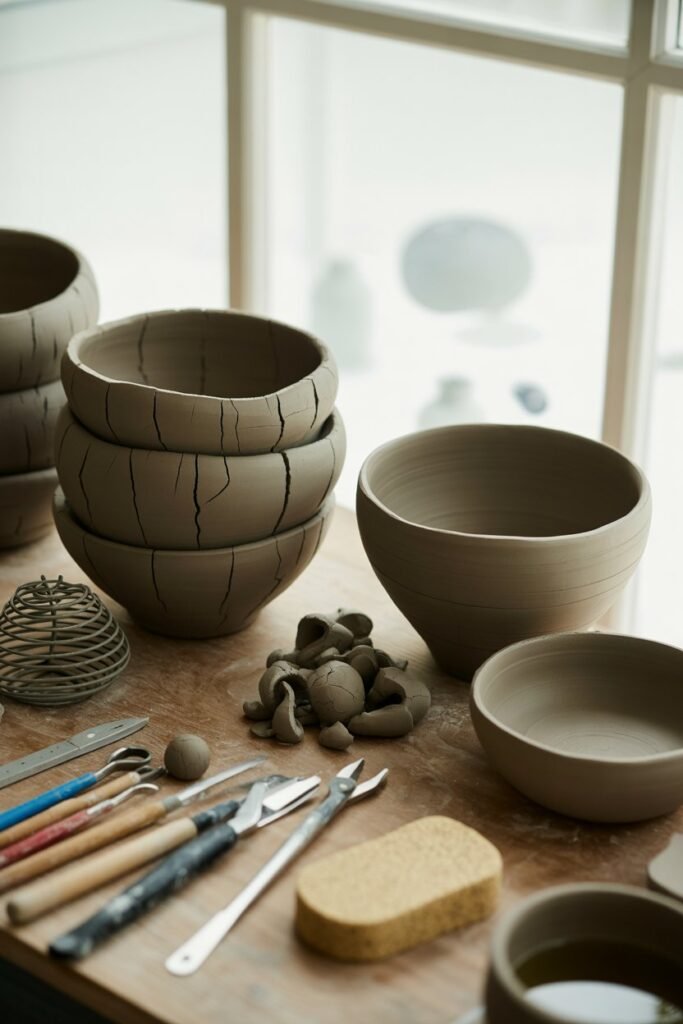
What You Need Before You Start
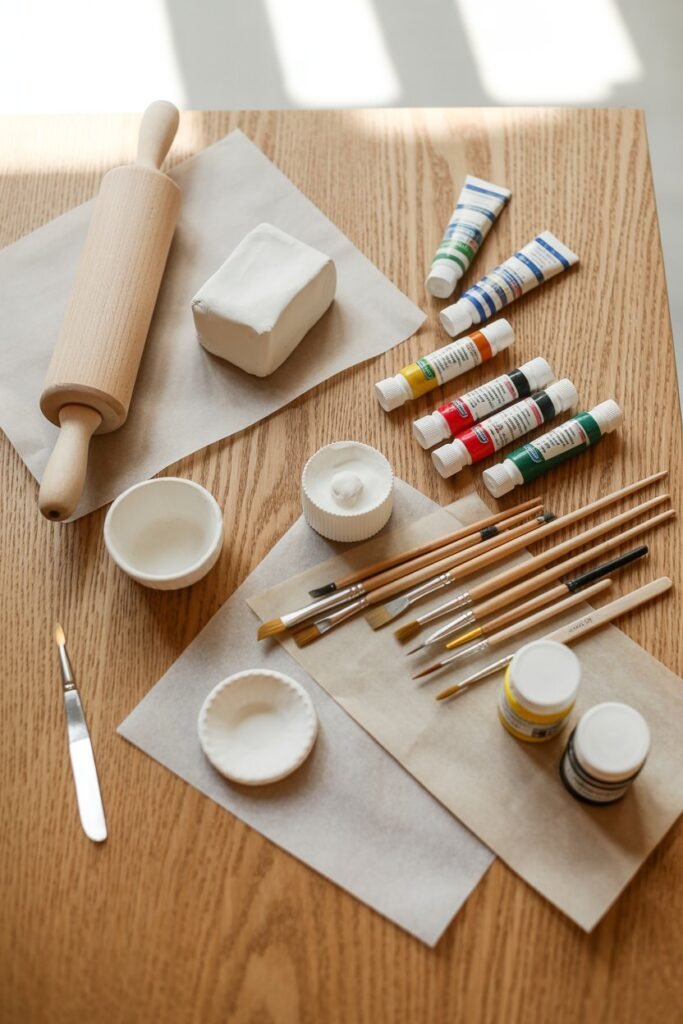
Before making your bowls, gather a few basic supplies. You do not need anything fancy to get started.
Essential Supplies
Air dry clay
Rolling pin
Craft knife or clay cutter
Sandpaper
Acrylic paint
Paintbrushes
Clear varnish or sealant
A bowl mold for shaping
Wax paper or parchment paper
Optional Supplies
Texture stamps
Lace fabric
Gold leaf
Clay sculpting tools
Sponges
Metallic paint
Small cookie cutters
Choosing good quality clay also makes a big difference. Softer clay is usually easier for beginners because it rolls smoothly and cracks less during shaping.
Tips Before Making Your Clay Bowls
If you want your bowls to look polished and professional, these tips will help tremendously.
Keep the Thickness Even
Uneven clay dries unevenly, which can cause cracks or warping. Aim for a smooth and consistent thickness throughout the bowl.
Work on Non Stick Surfaces
Wax paper or parchment paper prevents the clay from sticking and makes cleanup easier.
Smooth Cracks Early
Small cracks can usually be fixed with a tiny bit of water while the clay is still wet.
Let Bowls Dry Slowly
Drying too quickly can lead to cracking. Place bowls in a cool area away from direct sunlight or heat.
Seal the Finished Bowl
A sealant protects your bowl from moisture and helps paint colors last longer.
Now let us get into the fun part.
Here Are The 11 Gorgeous Air Dry Clay Bowl Ideas
Air dry clay bowls are simple to make, stylish to display, and perfect for adding a handmade touch to your home.
These gorgeous DIY bowl ideas are creative, beginner friendly, and easy enough to make in just one day.
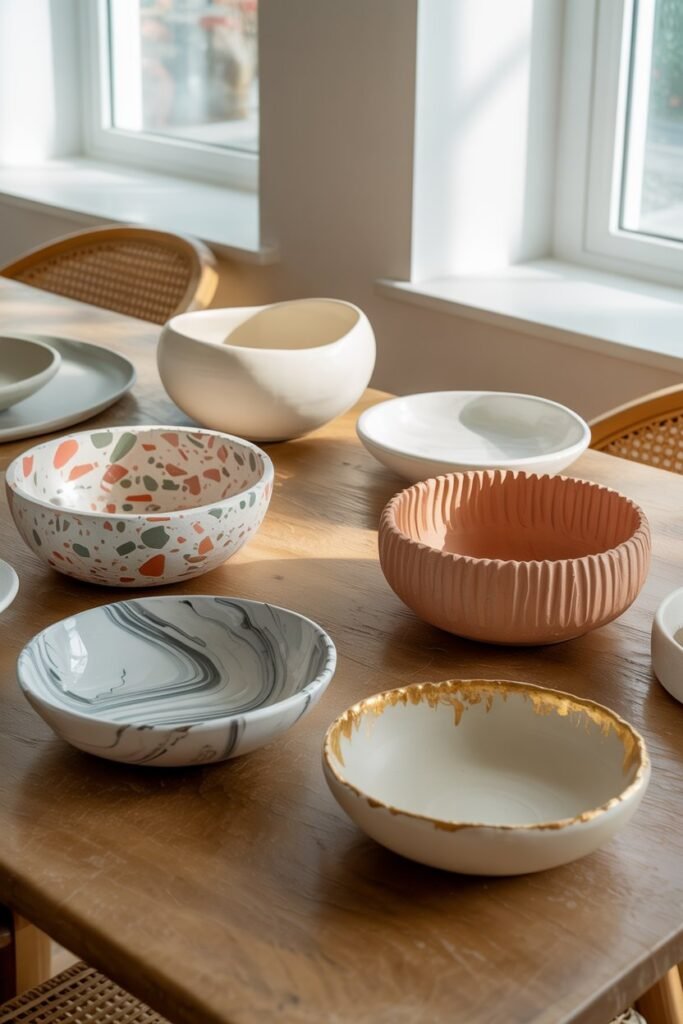
1. Minimalist White Clay Bowl
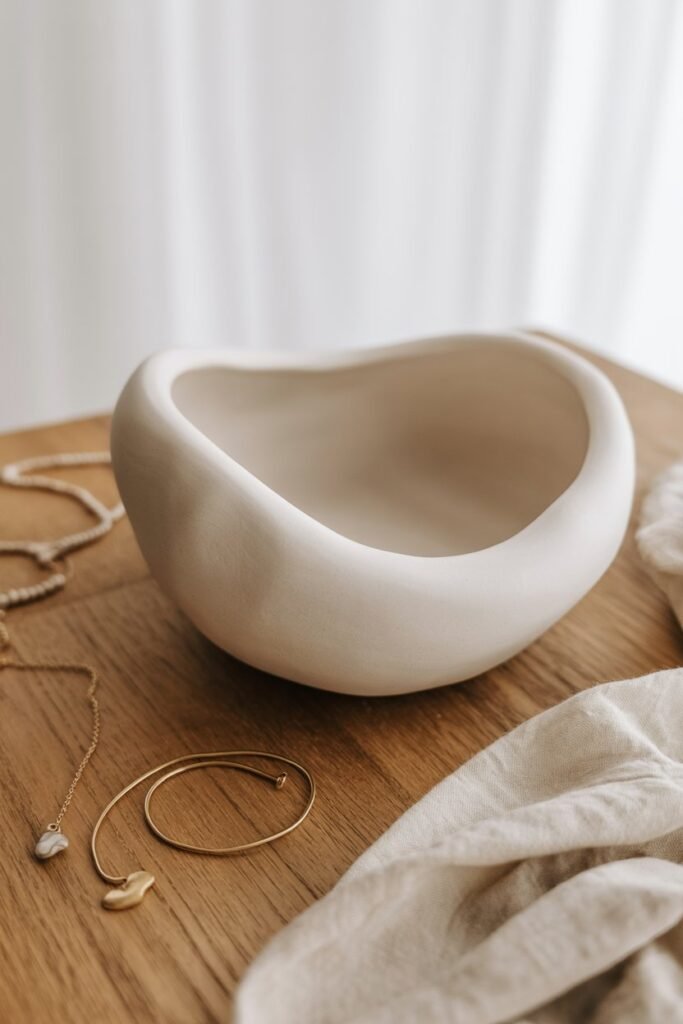
Minimalist bowls are simple, modern, and timeless. They fit beautifully into almost any home style.
How to Make It
Roll your clay evenly to medium thickness.
Place an upside down bowl on top of the clay.
Cut a circle around the bowl using a craft knife.
Carefully lift the clay circle and drape it over the upside down bowl mold.
Smooth the surface gently with your fingers.
Trim uneven edges neatly.
Allow the bowl to dry for 24 hours.
Once dry, sand rough areas until smooth.
Paint the bowl matte white or leave the natural clay exposed.
Finish with a matte sealant.
Styling Idea
Use this bowl on a bedside table for rings and jewelry.
2. Terrazzo Style Clay Bowl
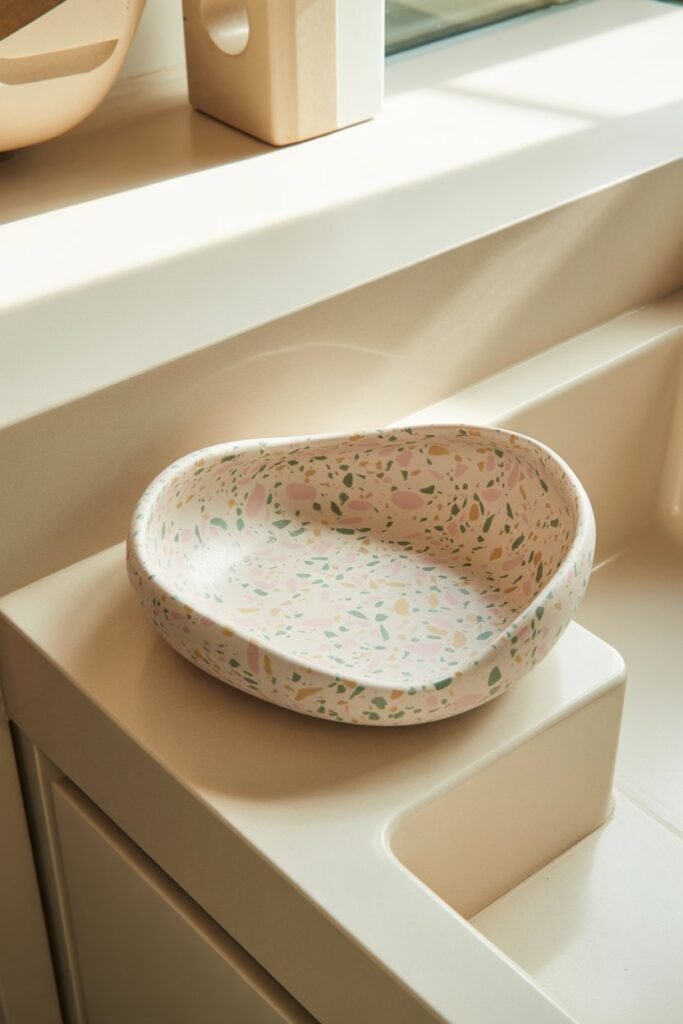
Terrazzo bowls look playful, artistic, and trendy.
How to Make It
Take small pieces of colored clay and flatten them into tiny shapes.
Mix the colorful pieces into white clay gently.
Roll the clay out carefully without overmixing the colors.
Cut a circle shape.
Place it over a bowl mold.
Smooth the edges.
Allow it to dry completely.
Sand lightly for a polished look.
Seal with gloss varnish for a modern terrazzo effect.
Best Color Ideas
Pastel pink and white
Beige and brown
Black and cream
Neutral earth tones
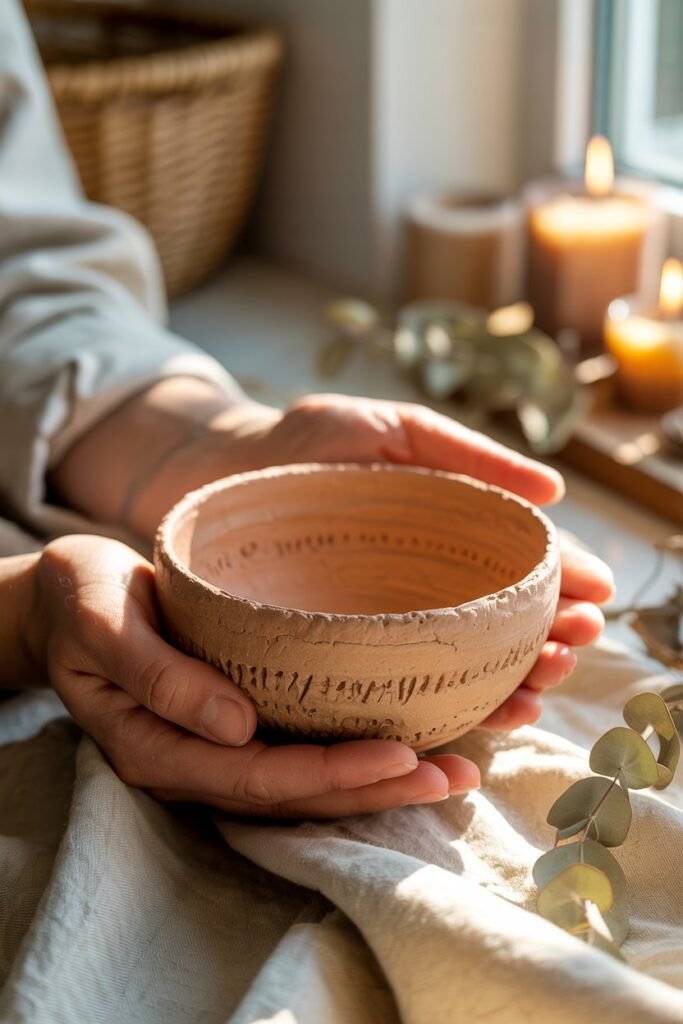
3. Boho Textured Bowl
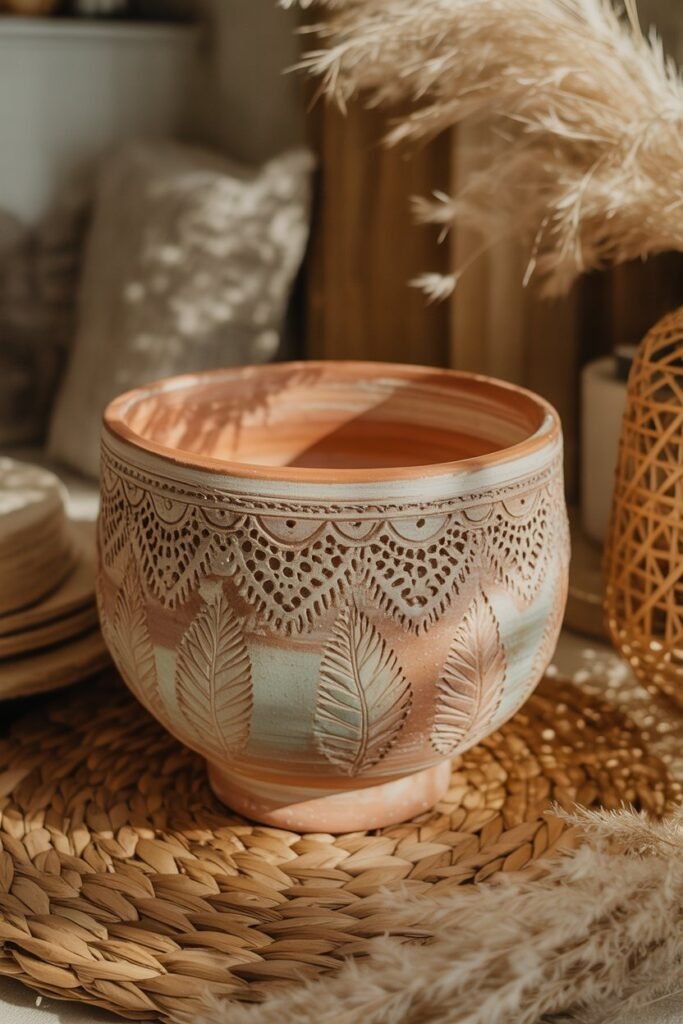
Boho bowls feel earthy, handmade, and artistic.
How to Make It
Roll your clay flat.
Press lace fabric, woven placemats, or textured objects into the clay surface.
Remove the texture item carefully.
Cut the clay into your preferred bowl shape.
Place over a bowl mold.
Smooth gently without flattening the texture.
Dry completely.
Paint using earthy shades like terracotta or sage green.
Dry brush white paint lightly across the raised texture for depth.
Seal with matte varnish.
Why It Looks Beautiful
The textured surface creates a handmade pottery look that feels warm and cozy.
4. Gold Rimmed Jewelry Bowl
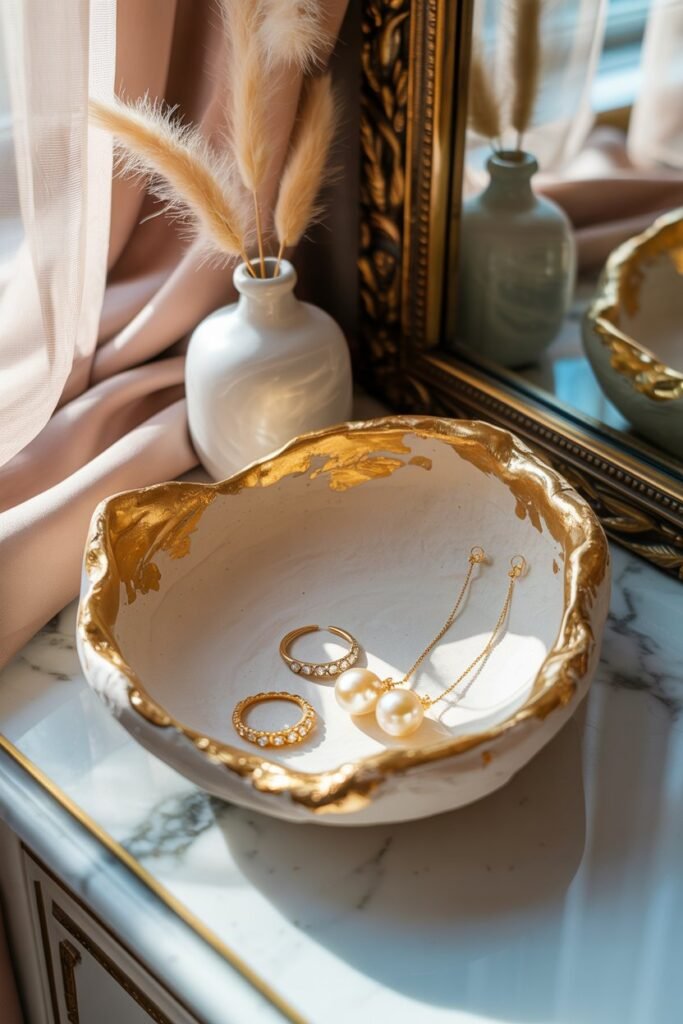
This bowl instantly looks luxurious and elegant.
How to Make It
Shape a simple bowl using rolled clay and a mold.
Allow the bowl to dry completely.
Sand the edges smooth.
Paint the bowl your chosen color.
Using a small detail brush, carefully paint gold metallic paint around the rim.
You can also apply gold leaf for a richer finish.
Seal carefully after drying.
Best Uses
Jewelry storage
Vanity decor
Gift ideas
Wedding keepsakes
5. Leaf Imprint Nature Bowl
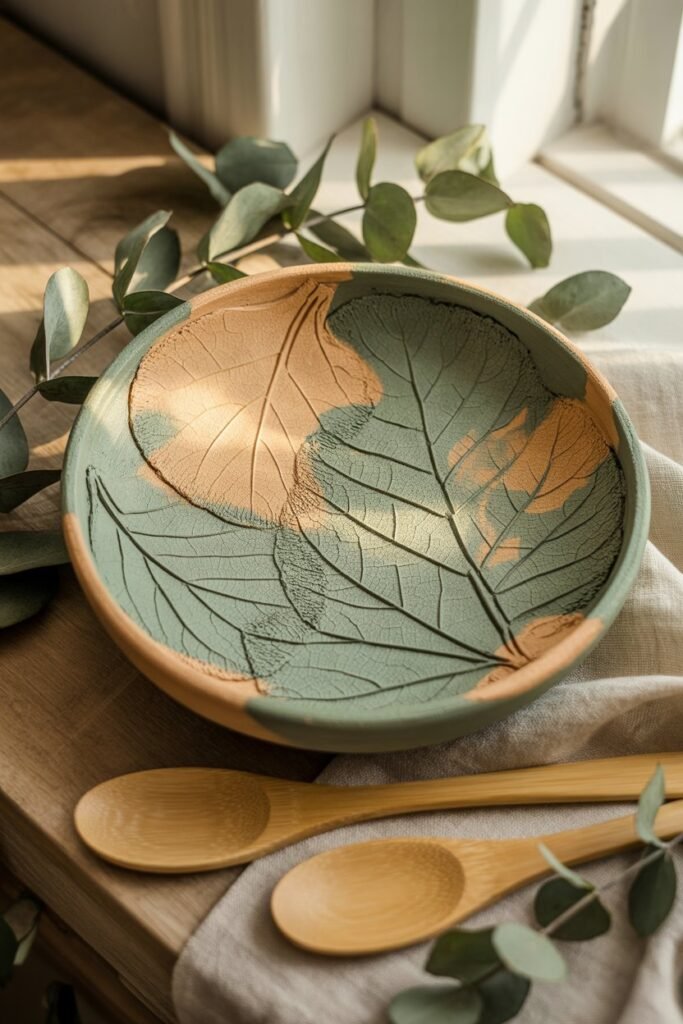
Nature inspired bowls always feel peaceful and unique.
How to Make It
Roll clay evenly.
Place a real leaf on top of the clay.
Use a rolling pin to gently press the leaf texture into the clay.
Remove the leaf slowly.
Cut around the design if desired.
Place over a bowl mold.
Shape carefully without damaging the imprint.
Allow it to dry fully.
Paint using earthy colors or metallic accents.
Seal the finished bowl.
Extra Tip
Large tropical leaves create dramatic patterns that look stunning.
6. Marble Effect Clay Bowl
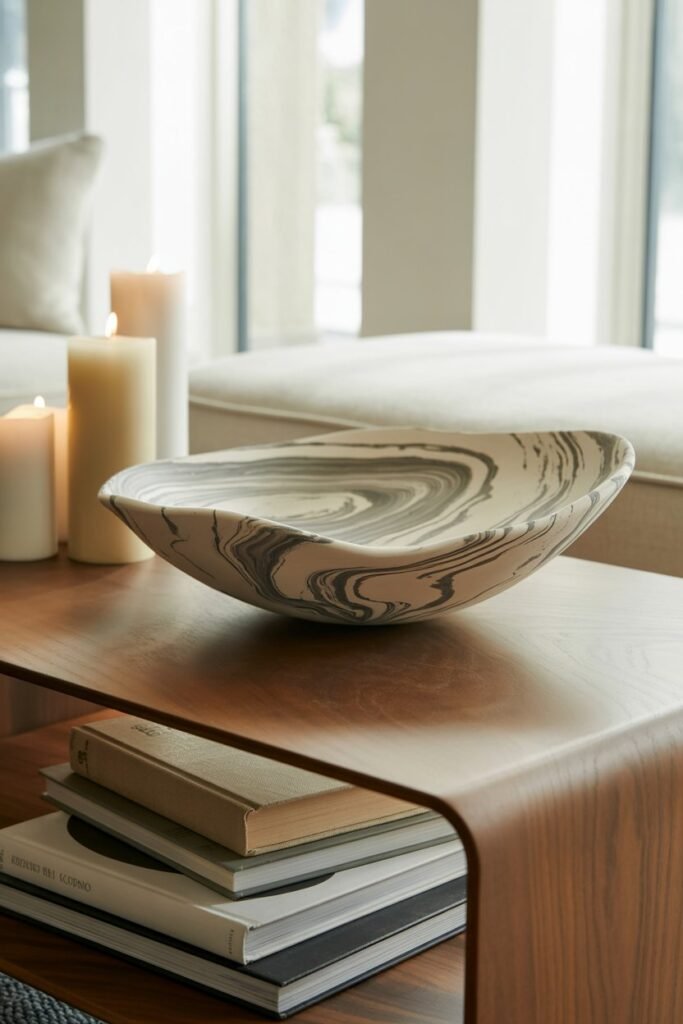
Marble bowls look expensive and elegant.
How to Make It
Take two or three clay colors.
Twist them together gently.
Do not overmix because you want visible swirls.
Roll the clay flat.
Cut into a circle.
Shape over a bowl mold.
Smooth carefully.
Dry fully.
Sand lightly if needed.
Seal with gloss varnish to enhance the marble effect.
Best Marble Color Combos
White and gray
Pink and cream
Black and white
Beige and ivory
7. Heart Shaped Trinket Bowl
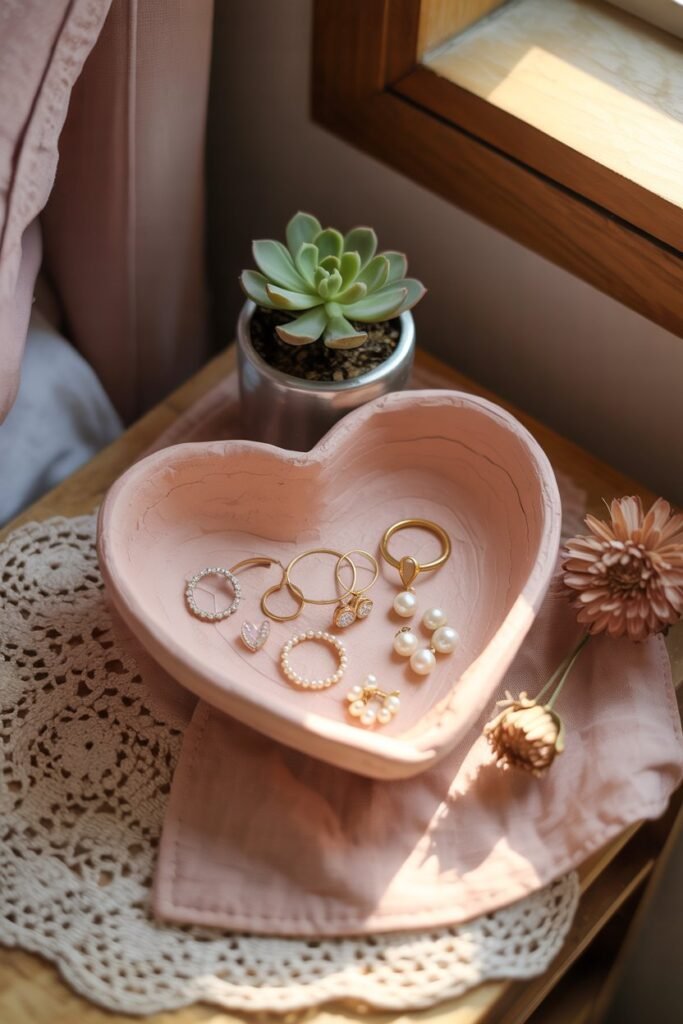
This bowl is adorable and beginner friendly.
How to Make It
Roll your clay flat.
Cut out a large heart shape using a template or knife.
Place the clay heart over a soft curved surface like a small bowl.
Gently curve the sides upward.
Pinch the bottom tip slightly to enhance the heart shape.
Allow to dry completely.
Paint using soft pinks, whites, reds, or neutral tones.
Seal after drying.
Perfect Uses
Ring dish
Candy bowl
Valentine decor
Handmade gifts
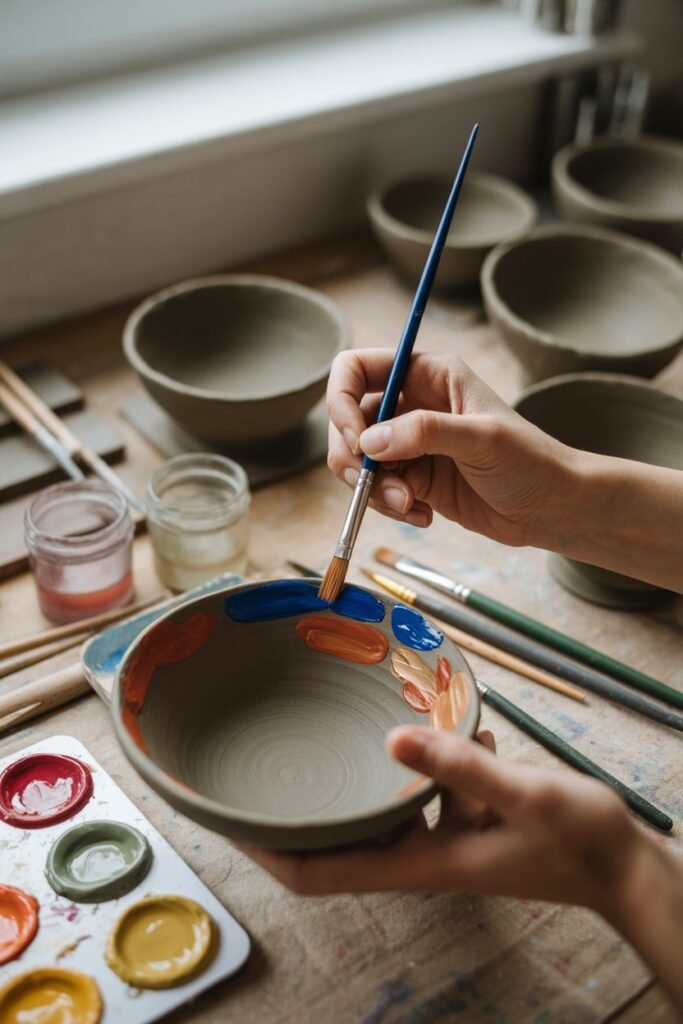
8. Abstract Painted Art Bowl

This project allows complete creative freedom.
How to Make It
Shape a simple clay bowl first.
Allow it to dry completely.
Paint abstract designs using acrylic paint.
Try brush strokes, dots, geometric shapes, or line art.
Layer colors for a modern artistic look.
Allow paint to dry fully.
Seal with varnish.
Design Inspiration
Neutral color blocking
Black line faces
Modern brush strokes
Minimalist abstract shapes
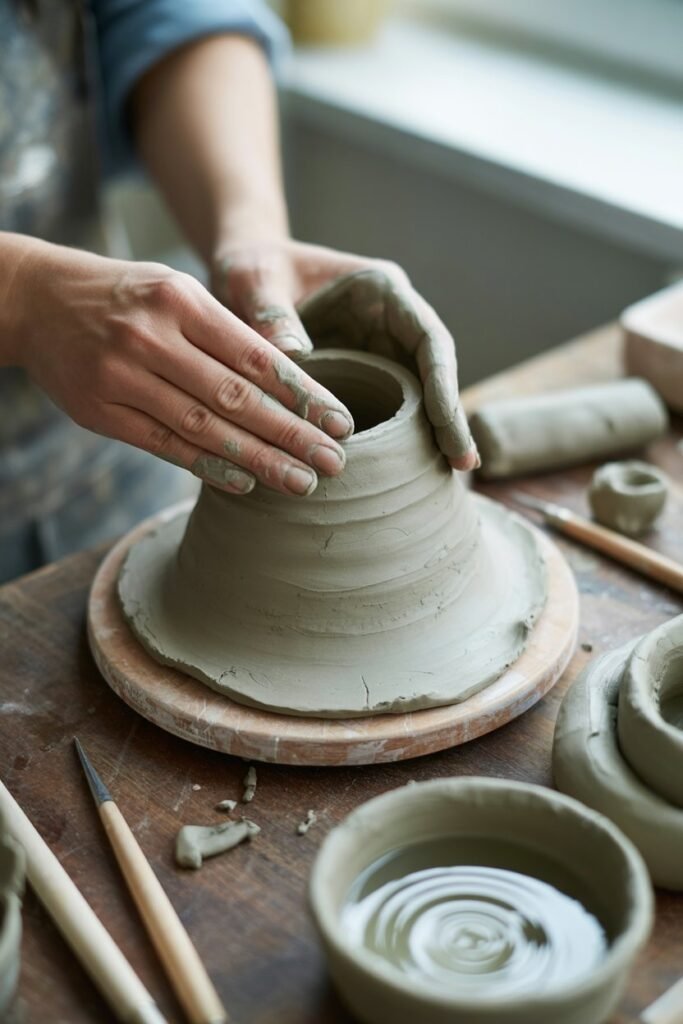
9. Rustic Pinch Pot Bowl
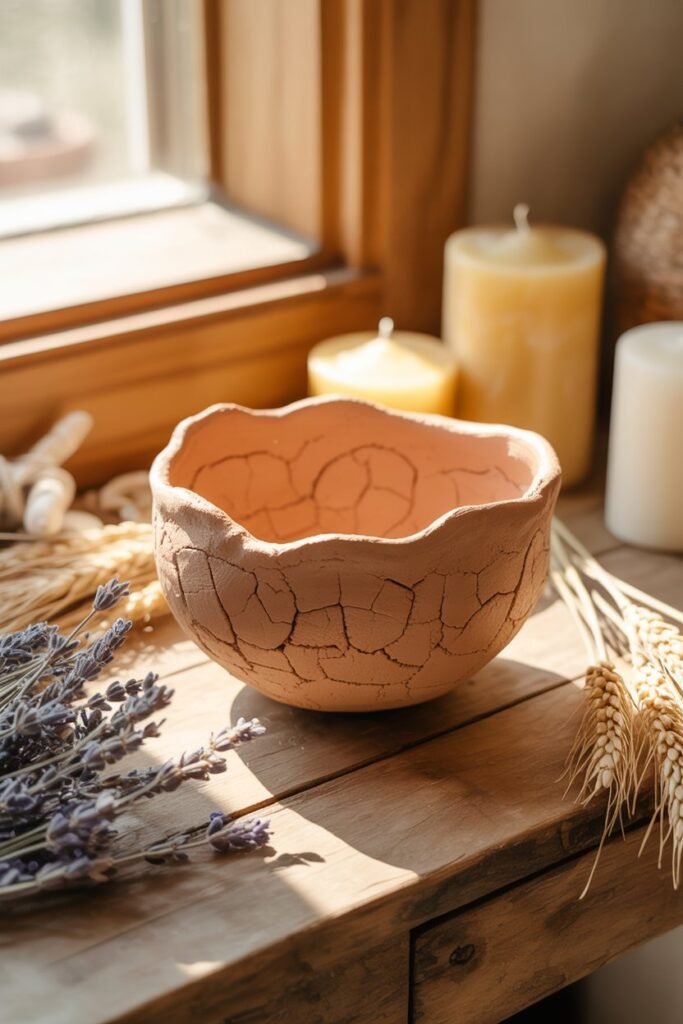
Pinch pots have a charming handmade feel.
How to Make It
Roll clay into a ball.
Press your thumb into the center.
Slowly pinch and rotate the clay to widen the bowl shape.
Keep smoothing the surface with your fingers.
Shape until satisfied.
Allow the bowl to dry naturally.
Sand rough spots lightly.
Paint or leave natural for a rustic pottery appearance.
Seal the finished bowl.
Why People Love This Style
The imperfect handmade look adds warmth and personality.
10. Celestial Moon and Star Bowl
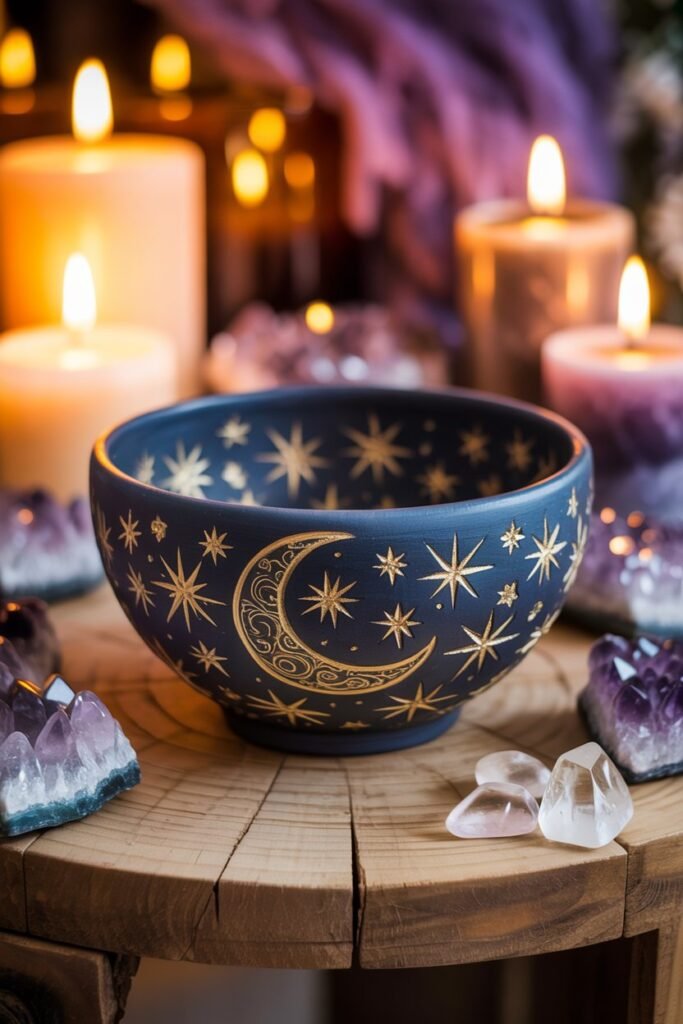
Celestial bowls are dreamy and trendy.
How to Make It
Roll your clay flat.
Shape into a bowl using a mold.
Before drying, carve stars, moons, suns, or constellations into the surface using clay tools.
Allow the bowl to dry completely.
Paint using dark shades like black or navy blue.
Highlight the carved details with gold or silver paint.
Seal with gloss varnish.
Best Decor Pairing
Candles and crystals create a cozy celestial aesthetic.
11. Scalloped Edge Decorative Bowl
Scalloped edges instantly make bowls look elegant.
How to Make It
Roll your clay flat.
Cut a circle shape.
Use your fingers or a rounded tool to pinch decorative curved edges around the rim.
Place over a bowl mold carefully.
Smooth the center while preserving the scalloped edges.
Allow the bowl to dry fully.
Paint in pastel or neutral shades.
Seal the bowl for protection.
Why This Bowl Looks Expensive
Decorative edges create a high end boutique appearance.
How to Paint Air Dry Clay Bowls Beautifully
Painting can completely transform your clay bowls from simple crafts into stunning home decor pieces.
Matte Paint Finishes
Matte finishes create a modern pottery inspired look that feels clean and minimal.
Glossy Finishes
Glossy sealants add shine and make colors appear more vibrant.
Metallic Details
Gold, silver, and bronze accents instantly elevate handmade bowls.
Neutral Colors
Cream, beige, white, and taupe create timeless pieces that blend easily with home decor.
Bold Colors
Bright shades create playful statement pieces perfect for colorful interiors.
Common Mistakes to Avoid
Even simple clay projects can go wrong without the right techniques.
Making the Clay Too Thin
Thin clay cracks easily and becomes fragile once dry.
Drying Too Fast
Heat and direct sunlight can warp or crack bowls.
Skipping Sanding
Sanding smooths rough edges and gives bowls a professional finish.
Forgetting Sealant
Unsealed bowls absorb moisture and may stain over time.
Using Too Much Water
Excess water weakens clay structure and creates messy textures.
How to Use Your Finished Clay Bowls Around the House
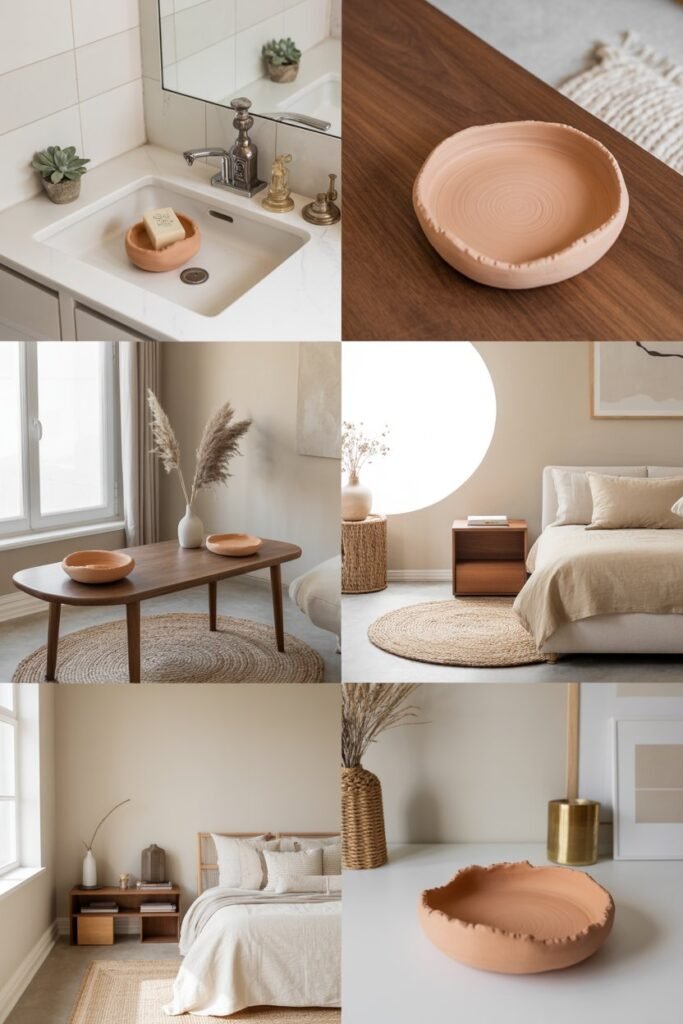
One of the best things about handmade bowls is how versatile they are.
You can use them in nearly every room.
Bedroom Ideas
Jewelry holders
Perfume tray accessories
Hair clip storage
Bedside decor
Bathroom Ideas
Cotton pad holders
Soap dish alternatives
Luxury counter decor
Living Room Ideas
Coffee table accents
Candle styling
Key holders
Decorative centerpieces
Office Ideas
Paper clip holders
Desk organization
Creative decor accents
Are Air Dry Clay Bowls Durable?
Many beginners wonder if air dry clay bowls actually last. The answer is yes, with proper care.
While they are not as strong as kiln fired ceramics, they can remain beautiful for years when sealed correctly and handled carefully.
However, they are best used for decorative purposes rather than heavy daily kitchen use.
Avoid:
Dishwashers
Microwaves
Long water exposure
Heavy impacts
Treat them like decorative handmade art pieces and they will last much longer.
Why Handmade Decor Feels More Meaningful
One thing I truly love about handmade clay projects is the emotional connection they create.
A handmade bowl carries personality, effort, creativity, and memory in a way store bought decor often cannot.
Every tiny imperfection tells a story.
You also gain something valuable during the crafting process itself. Working with clay can feel calming, grounding, and deeply therapeutic.
It encourages patience, creativity, and mindfulness in a world that constantly feels rushed.
That is why air dry clay projects have become more than just trends for many people. They are creative escapes.
FAQs
Can beginners make air dry clay bowls?
Yes. Air dry clay bowls are one of the most beginner friendly crafts because they require very few tools and simple techniques.
How long does air dry clay take to dry?
Most air dry clay bowls dry within 24 to 48 hours depending on thickness and room conditions.
Do air dry clay bowls crack easily?
They can crack if dried too quickly or made too thin, but proper technique greatly reduces cracking.
Can air dry clay bowls hold food?
Most air dry clay is best for decorative use only unless specifically labeled food safe after sealing.
What paint works best on air dry clay?
Acrylic paint is the most popular choice because it dries quickly and offers vibrant colors.
Do I need to seal air dry clay bowls?
Yes. Sealant helps protect the bowl from moisture, stains, and scratches while improving durability.
Can kids make these clay bowl projects?
Absolutely. Many of these bowl ideas are fun and safe for supervised children and family craft sessions.
Final Thoughts
Making your own air dry clay bowls is one of the easiest and most rewarding DIY projects you can try.
You do not need professional pottery skills or expensive equipment to create beautiful pieces that look stylish and unique.
Whether you prefer minimalist bowls, boho textures, marble effects, celestial themes, or elegant gold rimmed designs, there is truly something for every style and personality.
The best part is that these bowls are not just crafts. They become meaningful decor pieces that reflect your creativity and personal taste.
Start with one simple design and enjoy the process. You may be surprised by how relaxing and addictive clay crafting becomes once you begin.